Plugin Documentation

Detailed documentation about all features and settings of Booking Calendar Contact Form.

How it works?

From the dashboard/configuration area the process is as follows:

  1. Insert data fields into the form
  2. Configure the calendar availability, prices, form processing, emails and PayPal settings if needed
  3. Publish the form from a post or page (go to edit posts/pages or to the widgets area).

From the end user (visitor) point of view, the process is as follows:

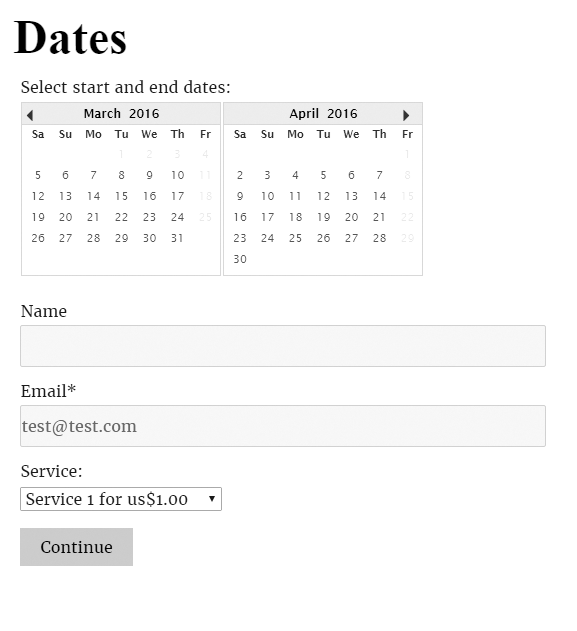
If the calendar is enabled it will appear in the top of the form and the user will be asked to select the start and end dates of the booking by clicking over the related dates in the calendar.

Once the dates have been selected the booking price will be shown below the calendar.

The rest of the form will appear below the calendar (or directly if the calendar isn't enabled) and the submit/continue button at the bottom of the form.

After clicking "submit / continue" there are three possible scenarios:

  • If PayPal is enabled: The user is redirected to PayPal and after completing the payment three emails will be sent: the automatic PayPal notification, the confirmation email to the user sent from the website and the notification email to the website administrator containing the booking details. At this point the booking will be confirmed and will appear in the bookings list and calendar. The dates are blocked in the calendar only if the "bookings overlap" options is enabled (it's enabled by default).

  • If PayPal isn't enabled: Two emails are sent immediately: the confirmation email to the user sent from the website and the notification email to the website administrator containing the booking details. The booking is considered as automatically confirmed in this case, so it will appear immediately into the bookings list and calendar.

  • If PayPal is optional: A radio-button field will be added above the "submit / continue" button to let the customer select "Pay with PayPal." or "Pay later".

  • In all cases, after returning from PayPal or after clicking the submit button if PayPal isn't enabled, the user will be redirected to the page specified into the settings field "URL to return after successful payment".

    Installation

    To install the WordPress plugin follow these steps:
    1. Download the plugin to your computer.
    2. Go to the plugins section in WordPress
    3. If has been installed installed another version of the plugin, deactivate it, and then press the corresponding "Delete" button.
    4. Press the "Add New" button at top of section.
    5. Press the "Upload Plugin" button, and select the zipped file downloaded in the first step.
    6. Finally, install and activate the plugin.

    Inserting the form on Page

    1. Configure the settings at the administration menu >> Settings >> Booking Calendar Contact Form.
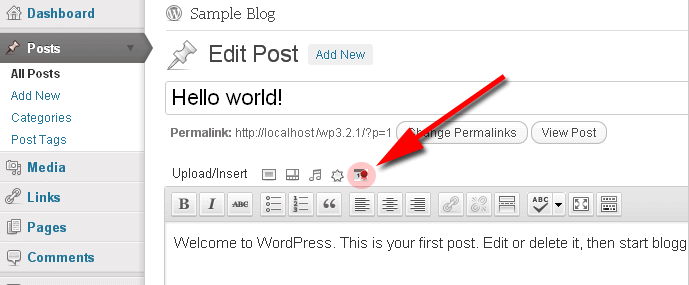
    2. To insert a form into some pages or posts, uses the icon that will appear when editing contents:

      Insert Form

    3. After doing that, the tag [CP_BCCF_FORM id="1"] will be inserted into your content. The "id" is optional, if not specified the first form will be used. When you preview the content in the public website that tag will be replaced by the reservation form:

      Form

    Managing Forms

    After going to the WordPress administration menu >> Settings >> Booking Calendar Contact Form you will see the list of forms/calendars like in the following image:
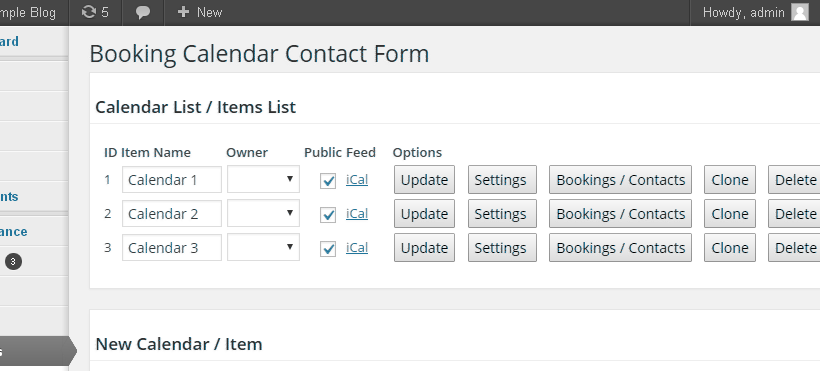
    Forms List

    For each form you will see the following options:
    • ID: Identification number of the calendar/form, useful when publishing an specific calendar or form.
    • Item Name: Some name to identify the calendar/form.
    • Owner: WordPress user that can edit the calendar. An user with "Editor Access Level" will see/manage only its own calendars.
    • Public: Specify if the calendar can be published.
    • Feed: Link for the feed in iCal format. Use this link to export the reservations to another calendar that supports this iCal: OutLook, Google Calendar, etc...
    • Update: Update the specified name, owner and public status for the calendar.
    • Settings: Go to the main settings area for the calendar.
    • Clone: Duplicate a calendar with its settings.
    • Bookings / Contacts: Printable list of bookings.
    • Delete: Delete the calendar and all its bookings and settings.
    • Shorttag: An alternative way for publishing the calendar.
    Check the submissions

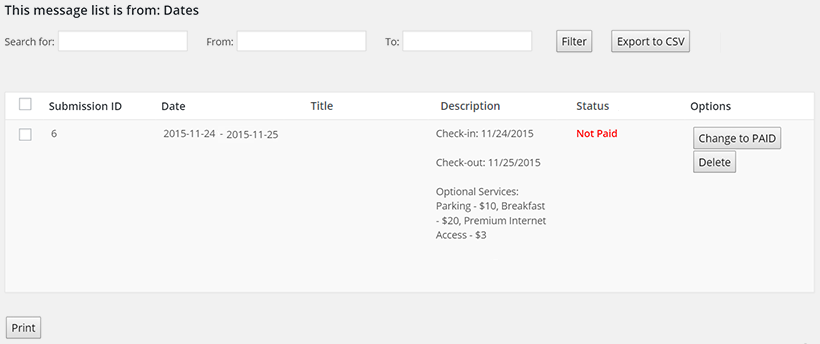
    Press the "Bookings / Contacts" button, corresponding to the calendar/form. The messages screen displays the list of submissions, and a filtering section to reduce the submissions by form, a time interval, or a text in the data

    From the messages screen it is possible remove a submission, or submissions group, change its status to paid/unpaid and also export all submissions to a CSV file

    Export the submissions to a CSV File

    For exporting the submitted information to a CSV file, press the "Bookings / Contacts" button corresponding to the calendar/form, and press the "Export to CSV" button, select the location where will be saved the CSV and that's all. The first row of CSV file allows identify each of fields, the text used to identify the field will be the short label, defined in the field, or the label in case that the short label is not defined.

    Blocking / Unblocking a Specific Date

    The calendar in the settings area appears only if it is enabled and if the option "Accept overlapped reservations" is set to "No" (it's the default value).

    To block a date interval click the start and end dates into the calendar, a floating panel will appear for entering some text (ex: specify why it's blocked), just enter some text and click "save", this action will block the dates.

    To edit/delete blocked dates use the edit and delete buttons that appear on the popup when moving the mouse over marked dates.
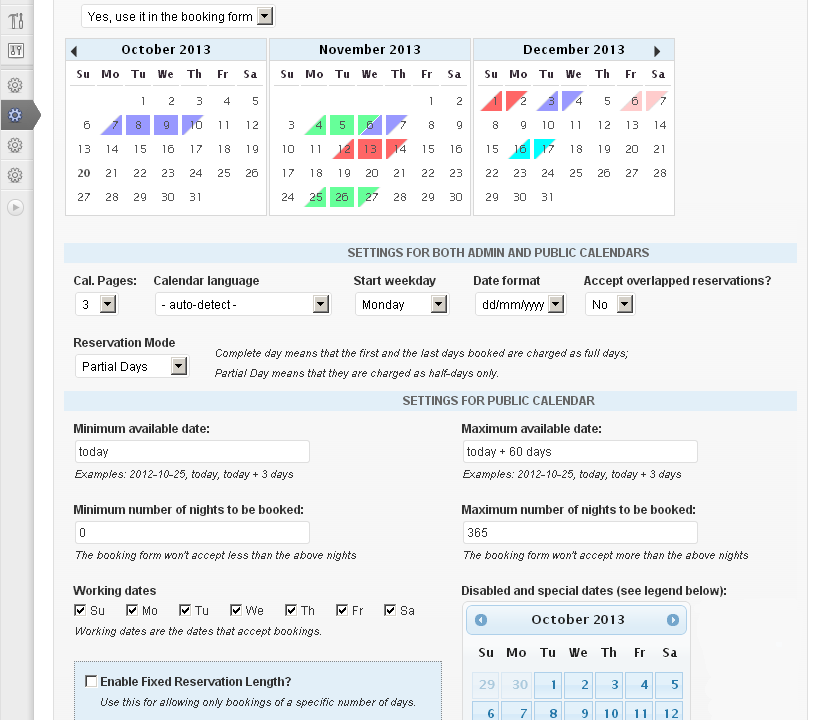
    Blocking dates

    Below the calendar there are several configuration settings that are explained in the section below.

    The Form Builder

    The Form Builder lets you to add/edit/remove fields into the form and also to specify the validation rules for your form (required fields, email fields, etc...).
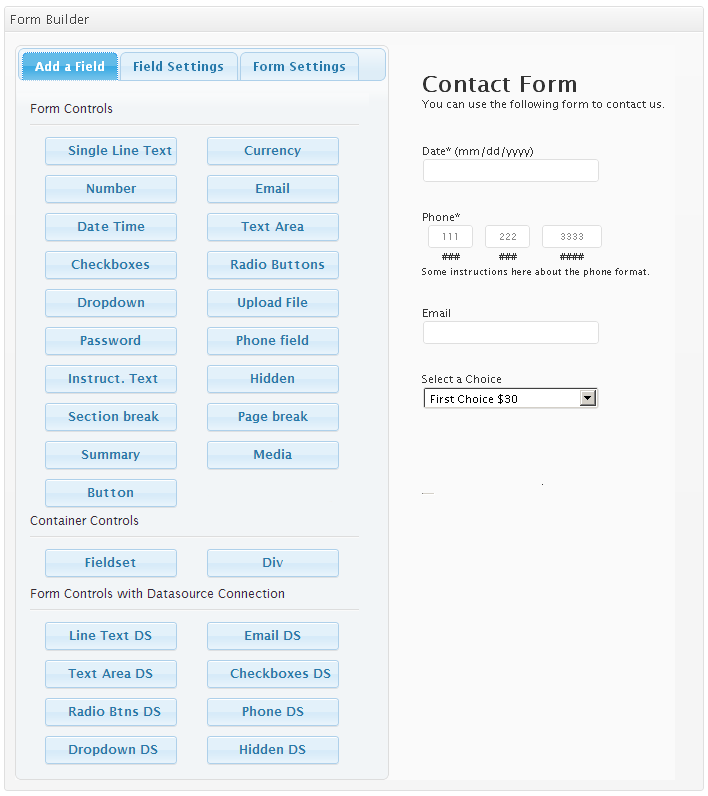
    Form Builder

    Form title and predefined designs

    The "Form Settings" tab allows define the form's title and description, as the placement of labels respect the fields (at top, at left, aligned to the right). In the "Form Settings" tab is possible to decide the form's design. The plugin includes multiple predefined designs.
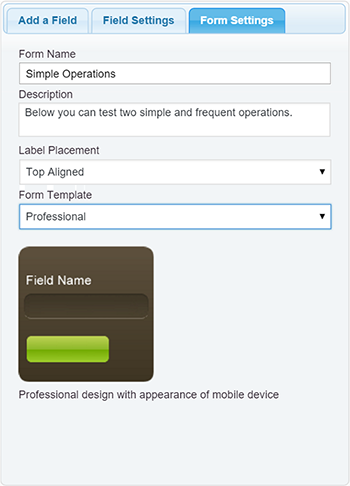
    Form Settings Tab

    The following field types are currently available(*):
    • Single Line Text: Classic text input.
    • Number: This field can validate if only digits or a valid number was entered.
    • Slider: Numeric field whose value is modified sliding a handle.
    • Currency: A classic input field for currency values, that allows separator for thousands, and currency symbols.
    • Hidden: A hidden field.
    • Email: This field validates that the email address has a valid format.
    • Date/Time: Date-picker. Can be setup also to show also a selectable year and month, for example for birth date fields, and time fields.
    • Checkboxes: Classic checkboxes, select one or more on a group.
    • Multiple Choice: Radio buttons, select one of many.
    • Dropdown: Classic select / dropdown field.
    • Upload File: For uploading files.
    • Password: A field that shows * instead the typed letters. You can also add a confirm password validation.
    • Phone field: Supports international formats line ###-###-#####. The format is configurable.
    • Comment area: It's a comment to introduce to a section of the form or give instructions to the user.
    • Summary: Displays a summary of form fields with the values entered.
    • Section Break: It's a line for separating areas group of fields
    • Page Break: Useful for creating multi-page forms. The "page break" marks the start of a new page in the form builder
    • Instruct. Text: Text field to display instructions for users.
    • HTML Content: Field for general purpose, to include HTML tags in the form.
    • Media: Allows insert images, audios or videos.
    • Button: Insert a button in the form.

    * Note: Some of the field types are available only in the commercial versions of the plugin.

    Container Fields

    The form builder includes some container controls. The container controls allow to insert another controls in them:

    • Fieldset Container: Allows insert a fieldset control in the form, with a legend.
    • Div Container: Inserts a container very useful for grouping related controls, and not modifies the appearance of the form.
    DataSource Fields

    In addition to the above, the following fields are available only in the commercial versions of plugin:
    • Line Text DS: An input field that gets its default values from one of following datasources - Database, Posts information, Taxonomies information or Users information.
    • Number DS: An input field that gets its default values from one of following datasources - Database, Posts information, Taxonomies information or Users information.
    • Email DS: An input field for Email address that gets its default values from one of following datasources - Database or Users information.
    • Text Area DS: A text area field that gets its default values from one of following datasources - Database, Posts information.
    • Checkboxes DS: Checkboxes for selecting one or more options into the same field that gets its options from one of following datasources - Database, CSV, Posts information, Taxonomies information or Users information.
    • Radio Btns DS: Radiobuttons for selecting one option between the options available for the field that gets its options from one of following datasources - Database, CSV, Posts information, Taxonomies information or Users information.
    • Drop-down DS: A select / drop down list for selecting one of the values listed that gets its options from one of following datasources - Database, CSV, Posts information, Taxonomies information or Users information.
    • Hidden DS: A hidden field that gets its value from one of following datasources - Database, Posts information, Taxonomies information, or Users information.
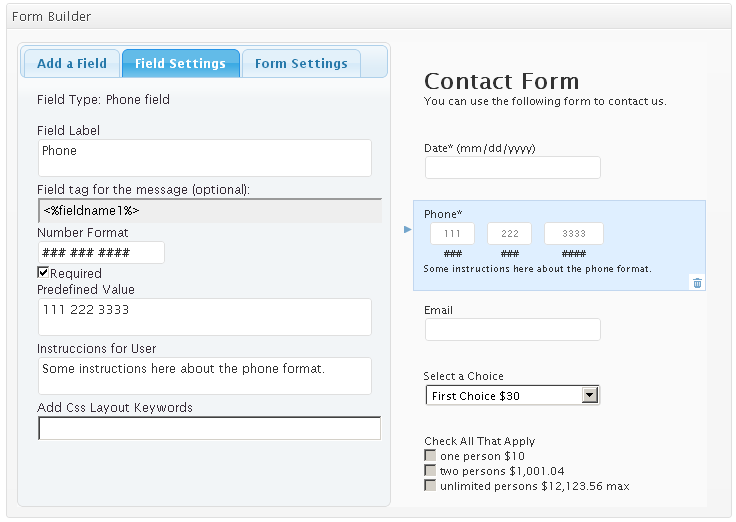
    Editing the field settings in the Form Builder

    Field Settings

    When you click a field already added, you can edit its details and validation rules. The following properties are useful:

    • Field Label: Label for the field in the public form and into the email.
    • Field tag for the message: In addition to the general <%INFO%> tag, you can use this tag to show the field value into a specific tag of the email.
    • Specific settings: The settings depends of the field type, for example the format of the phone number, the date format, etc...
    • Validation rule: The validation rules depends of the field type, example: required, only digits, valid email, valid number, etc...
    • Predefined value: Pre-filled value for the field, if any.
    • Instructions for user: This text will appear in a smaller form below the field. It's useful for giving instructions to the user.
    • Add CSS layout keywords: Customize the look & feel. If used, this field must contain the name of the CSS class and not the styles rules directly.
    Other features in the form builder:
    • Equal fields validation: Use it for example to confirm if the email or password typed in two different fields are the same. This is valid for "Single Line Text", "Password" and "Email" fields.
    • Dependent fields: Use this feature for show/hide fields (any field type) based in the selection made on other fields (checkboxes, radiobuttons or select/drop-down fields).
    For DataSource controls (commercial versions of plugin)

    This is a step by step about the use of datasource controls

    1. Insert in the form the control with access to external datasources (these controls are represented with the DS at the end of its names)
    2. Select the control in the form, and pays attention to the "Define Datasource" section.

      There are different datasources: Database, CSV file, Post Type, Taxonomy, and User Data.

      • Database, allows populate the field with the data stored in database.
      • CSV, allows populate the field with the data stored in a CSV file (Datasource available only in fields with multiple entries: DropDown DS, Checkbox DS, Radio Button DS).
      • Post Type, allows populate the field with the information associated to a specific post type (like the products names in a Woocommerce, etc.)
      • Taxonomy, allows populate the field with the information of taxonomies.
      • And finally the User Data, with the data of users in WordPress.

      Note: Depending of control selected will be available all available datasources, or not.

    So, suppose we want populate the field with the data stored in a database table.

    1. Select Database, from the list of datasources.
    2. If the database is different that used by WordPress, will be required enter the Host's address, the authentication data to connect to the database (username and password), and the name of database(a host can include multiple databases). There is a button for testing the database connection.

      Note: If the database is the same used by WordPress, leave empty the fields above.

    Now its time to define the query to database

    1. Enter the name of table's column, that store the control's values. If you are using the Drop-down DS control, it has multiple options; each option of drop-down list includes a value and text; in this option you determine the column in the table that includes the values of options.
    2. Enter the column's name that stores the control's texts. Similar to the previous step, but in this case the column stores the texts of the options (in case of checkbox or radio buttons, this column contain the label of options)
    3. Type the table name, a database can include multiple tables, you should identify the table you are using.
    4. Type a condition if required. If you want filtering the values to display in the control, type the condition in this attribute. For example, suppose you want load the data of posts that are public, the condition in this case would be: post_status='publish', where post_status is the name of column, and publish is the value for filtering.
    5. The "Order by" is used to order the query results by the values in columns, and not by the order that data were stored in database. For example, suppose you want populate the control with the users names of WordPress, and you want order the results alphabetically, in this case the "order by" would be: display_name ASC, where display_name is the column's name, and will be ordered in ascending way.
    6. Limit, enter an integer number to reduce the number of query results.

    If your query is very complex, and you prefer create it manually; selects the option "Custom Query", but in this case you should type all the query. Pay attention because you should use alias in the "SELECT" clause, to indicate the colum used to get the values, and the column used to get the texts. For example, a hypothetical query:

    SELECT column1 AS value, column2 AS text FROM tablename WHERE column3 > 5 ORDER BY column2 ASC LIMIT 5

    The use of database as datasource, allows filtering the information to populate the fields with the values on other fields in the form, or javascript variable. The use of variables are only accepted in the "Condition" section ("WHERE" clause), and requires the format: <%varname%>. For example, to get the title of a post, filtering by its ID, if the id is defined through the fieldname3 field, the "Condition" attribute of the query would be: ID=<%fieldname3%>

    How to use CSV files as datasource?

    The CSV files can be used as data sources for fields with multiple choices (DropDown DS, Radio Btns DS, Checkboxes DS). The initial steps are similar to the previous section, but selecting the "CSV" option as data-source instead of selecting "Database".

    A comma-separated values (CSV) file stores tabular data (numbers and text) in plain text. Each line of the file is a data record. Each record consists of one or more fields, separated by commas. The use of the comma as a field separator is the source of the name for this file format.

    For CSV files, the plugin includes the attributes:

    Select CSV file: file field to select the CSV file.

    Use headline: tick the checkbox if the first line of CSV file is a headline to identify the data in the next records.

    Delimiter: enter the delimiter symbol used as the field separator on each record.

    Press the "Import CSV" button to import the records into the form. This action will feed the lists "Select column for texts" and "Select column for values", that are used for selecting which fields will be used texts and values of the choices in the DS field.

    Create dependencies between fields

    Some fields, like radio groups, checkboxes and drop-down menu, allow dependencies in function to the option selected.

    For example, suppose your form includes a radio-group control with multiple choices: - House, - Car, - Electrodomestics, and each of them, uses different attributes. The house requires fields for address, number of rooms, etc; the car requires a field for trademark, model, etc. and finally the electrodomestics, will need type of electrodomestic,and more. So, if you want display the fields, depending of choice selected:

    1. Select the radio group fied in the form editor.
    2. Press the "Show dependencies" link, in the choices area.
    3. and select the field to display if the choice is selected. If you need associate multiple fields to the choice, press the plus button and select the new fields.

    Settings area of the forms

    For each calendar/form you will be able to edit the following settings:

    Calendar Settings:
  • Use/display calendar in the booking form?: Select if you want to use the calendar in your contact form.
  • Calendar: Calendar that allows to block dates and manually add/edit/delete bookings. This calendar appears only of the calendar is enabled in the previous field and if overlapped bookings aren't allowed (configuration field below).
  • Settings for both admin and public calendars:
  • Calendar Pages: Number of calendar months to display at the same time.
  • Calendar language: The calendar language. Currently supports English, Dutch, German, French, Italian, Japanese, Portuguese, Spanish.
  • Start weekday: The start weekday of the week. Default is Sunday.
  • Date format: The date format mm/dd/yyyy or dd/mm/yyy.
  • Accept overlapped reservations?: Select if overlapped bookings will be allowed. The blocked dates aren't used if this feature is enabled.
  • Reservation mode: Specify whether the calendar will be using "complete day" or "partial day" system. Complete day means that the first and the last days booked are charged as full days while Partial Day means that they are charged as half-days only.
  • Settings for and public calendars:
  • Minimum available date: You may want some time to review the booking, so you can set the minimum selectable date as a fixed date (Ex: 2012-10-25) or as a relative date like "today" or "today + 3 days".
  • Maximum available date: Similar to the previous field, in this case for selecting the maximum selectable date.
  • Minimum number of nights to be booked: A number that indicates the minimum number of nights to be booked.
  • Maximum number of nights to be booked: A number that indicates the maximum number of nights to be booked.
  • Working dates: Working dates are the dates that accept bookings. Use this for example to disable the weekends or other specific weekdays.
  • Disabled and special dates: Click a date to mark it as disabled, for example for disabling holidays or other dates where reservations aren't allowed.
  • Enable Fixed Reservation Length?: Use this for allowing only bookings of a specific number of days. More details in the next section.
  • Form Builder:

    Already explained in sections above.

    Validation and submit button texts
  • Submit button: Label used for the submit button, related configuration and hints.
  • Validation Texts: Use this section to specify the validation texts and its translations if needed.
  • Price Configuration:
  • Currency: The currency, example: USD, EUR, GBP, etc...
  • Default request cost (per day): Payment amount requested to confirm a booking. This amount is the fee per day, for example if the value specified here is us$25 and the reservation is for 4 days then the payment amount will be us$100.
  • Total request cost for specific # of days, # of days to setup: The "total" request cost for bookings of a specific number of days. This has precedence over the default cost...
  • Supplement for bookings between a specific number of nights: It's a value that will be added to the booking cost of the number of nights booked is into the specified range. This is useful (for example) for applying a supplement for short bookings.
  • Season configuration: Use this area to set different daily prices for different dates. Season prices, if defined, override the "Default request cost" specified above.
  • Paypal Payment Configuration:
  • Enable Paypal Payments: Allows to enable/disable the Paypal payment option (available only in "pro" version). The free version supports only PayPal enabled. The pro version supports other two options: Don't use PayPal or "Optional" to let the customer select PayPal or just submit the booking for a payment later. If "Optional" is selected (pro version), a radio-button field will be added to let the customer select "Pay with PayPal." or "Pay later".
  • Paypal email: The email of the Paypal that will receive the payments.
  • Paypal product name: The name that will appear to the customer at Paypal.
  • URL to return after successful payment: After the Paypal payment the user may go back to a page into your website (usually a "thank you" page). Paste here the complete address of that page.
  • URL to return after an incomplete or cancelled payment: After a canceled/incomplete Paypal payment the user may go back to a page into your website, usually a page with more instructions or requesting feedback. Paste here the complete address of that page.
  • Paypal language: The language that will be used for the Paypal payment. It's any Paypal supported language.
  • Discount Codes: Use this section to define the accepted discount codes and the discount percent. A 100% discount means that the payment isn't required.
  • Optional Services/Items Field:

    If enabled, use the services/items field as: Define here how you want to use this field. There are 4 possibilities:
  • Additional items field. The item price will be added ONCE to the above prices.
  • Additional items field per day. The item price will be added for each day to the above prices.
  • Price per day field. This price will overwrite the above prices.
  • Fixed price. This price will overwrite the above prices.
  • Options: Enter here the options/items. This "Optional Services/Items Field" will be taken in account only if some option or item is added in this field. The field format and a sample are specified beside the field on the settings page.
  • Notification Settings to Administrator(s):
  • Notification "from" email: The email used as from in the notifications.
  • Send notification to email: The email address where the notification will be sent to (ex: your email address).
  • Email subject notification to admin: Subject of the notification email that you will receive.
  • Email notification to admin: Content of the notification email that you will receive. Keep the tag %INFORMATION% that will be replaced automatically by the booking information.
  • Email Copy to User (auto-reply):
  • Email field on the form: Select which of the form field will contain the user's email address to send the auto-reply.
  • Email subject confirmation to user: Subject of the thank you/confirmation email sent to the user (customer) after completing the payment.
  • Email confirmation to user: Content of the thank you/confirmation email sent to the user (customer) after completing the payment. Keep the tag %INFORMATION% that will be replaced automatically by the booking information.
  • Captcha Settings:

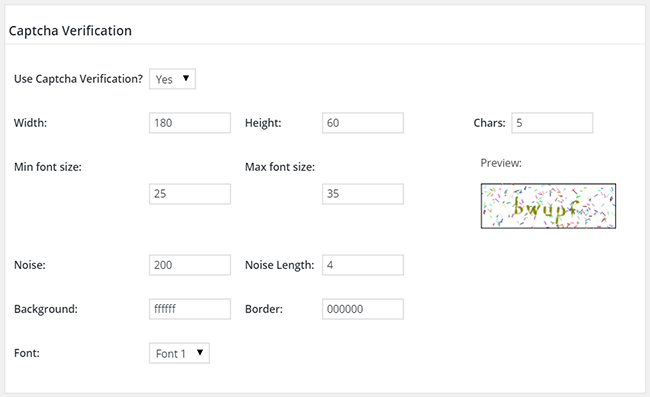
    Captcha Settings

    • Use Captcha Verification?: Select if the captcha image will be used.
    • Width: Width of the captcha image.
    • Height: Height of the captcha image.
    • Chars: How many characters will appear in the captcha image.
    • Min font size: Minimum size used for the font (randomized).
    • Max font size: Maximum size used for the font (randomized).
    • Preview: Preview for checking how the captcha image will look.
    • Noise: Amount of noise to make it stronger.
    • Noise Length: Length of the noise to modify its look.
    • Background: Background color.
    • Border: Border color.
    • Font: Base font used to render the text. Four options already included.

    Special tags in the notification emails

    In addition to the possibility of editing the email contents you can use the following tags (commercial versions):

    • <%itemnumber%>: Request ID.
    • <%startdate%>: Selected start date for the appointment.
    • <%enddate%>: Selected end date for the appointment.
    • <%coupon%>: Coupon code entered, if any.
    • <%discount%>: Discount applied, if any.
    • <%service%>: Selected service, if any.
    • <%totalcost%>: Total cost.
    • <%email%>, <%subject%>, <%message%>, <%fieldname1%>, <%fieldname2%>, ...: Data entered on each field.

    Add-Ons

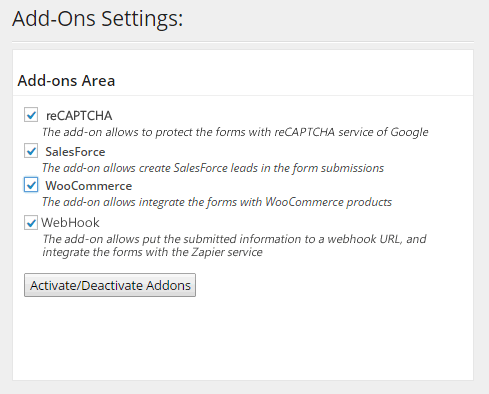
    The list of add-ons available in the plugin, appear in the "Add-ons area" of settings page of the plugin. For enabling the add-ons, simply should tick the corresponding checkboxes, and press the "Activate/Deactivate Addons" button.
    Add-ons

    WooCommerce add-on (Beta Version)

    The commercial versions of the plugin includes the WooCommerce add-on, to integrate the forms created by the "Booking Calendar Contact Form" with the WooCommerce products. The add-on inserts an additional metabox in the WooCommerce products, with two settings fields:

    • Enter the ID of the form: Allows select the form that will be associated to the product.
    • Calculate the product price through the form: Allows calculate the price of the products through the form.
    • Minimum price allowed: The minimum price applied to a product.
    • Activate the summary: Allows customize the fields included in the cart page of WooCommerce.
    • Summary title: Enter the summary title.
    • Summary: Define the summary, are accepted all special tags supported by the notification emails and the thank you page.

    Note: If you want calculate the price of products through the form, will be required that you select the field of the price in the attribute: "Request cost" in the form's settings.

    WooCommerce Add-on

    SalesForce add-on (Beta Version)

    The add-on allows create new leads in the SalesForce account with the data submitted by the forms.

    To create new leads in SalesForce with the data submitted by a form, be sure that the SalesForce account has enabled the Web-to-lead option, and then go to the form's settings:

    • Enter the OID (Organization ID)
    • For debugging the lead creation, tick the "Enabling debug" option, and enter the email address where receive the information. For production, untick the debugging option.
    • Press the "Add attribute" button, select the Lead attribute, and enter a fixed text, or the name of the field in the form (fieldname#)

    Note: The Add-on includes the list of predefined attributes of Leads, but it is possible to enter custom attributes too.

    SalesForce Add-on

    WebHook add-on (Beta Version)

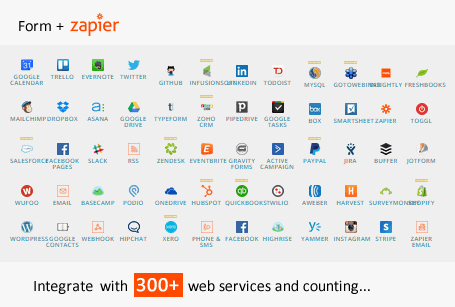
    The add-on allows posting the submitted information by the forms to WebHooks URLs. With the WebHook add-on it is possible integrate the forms created by the plugin with services like Zapier. The Zapier connects services as important and popular as Zoho CRM, Dropbox, Mailchimp, Evernote, Google Drive, Facebook, Twitter, and more than 300 services(Zapier apps)

    Use this add-on is as simple as entering the WebHooks URLs, through the WebHook section in the forms settings. To associate a form with multiple WebHooks, simply press the "Add new url" button, to add a new input field.

    Note: About Zapier service, select Webhook as the Trigger app, and "Catch Hook" as the trigger for this app.
    WebHook Add-on

    reCAPTCHA add-on (Beta Version)

    The add-on allows to protect the forms using the Google reCAPTCHA instead of the captcha distributed with the plugin. reCAPTCHA is more visual and intuitive than the traditional captcha, with just a single click the users confirm they are not a robot.

    reCAPTCHA (its official name is No CAPTCHA reCAPTCHA) as they define themselves:

    reCAPTCHA is a free service that protects your website from spam and abuse. reCAPTCHA uses an advanced risk analysis engine and adaptive CAPTCHAs to keep automated software from engaging in abusive activities on your site. It does this while letting your valid users pass through with ease.

    reCAPTCHA offers more than just spam protection. Every time our CAPTCHAs are solved, that human effort helps digitize text, annotate images, and build machine learning datasets. This in turn helps preserve books, improve maps, and solve hard AI problems.

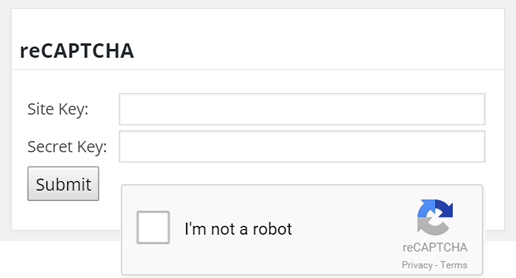
    To use reCAPTCHA in your forms, activate the add-on in the the settings page of the plugin, through the menu option: "Settings/Booking Calendar Contact Form", tick the checkbox: "reCAPTCHA", and press the "Update" button.

    The activation of reCAPTCHA displays a new section for entering the site key, and the secret key, two keys provided by Google reCAPTCHA to protect the website, and validate the forms submissions respectively.
    reCAPTCHA Add-on

    Mollie (iDeal)

    The Mollie addon provides integration with iDeal, the most popular Dutch payment method. The integration is made via Mollie: www.mollie.com.

    You're easily connected to iDEAL through Mollie without the dreaded technical and administrative hassle. The iDEAL platform combines the online banking systems of 10 of the largest Dutch banks (ABN AMRO, ASN Bank, Bunq, ING, Knab, Rabobank, RegioBank, SNS Bank, Triodos Bank and van Lanschot) into one payment method.

    After the consumer selects the iDEAL payment method the consumer's bank is selected. The actual payment then takes place in the bank's trusted online banking environment - for which security is guaranteed by the bank. Through iDEAL buyer and seller are guaranteed a transparent transaction without hidden fees or other unpleasant surprises.

    Mollie iDeal Add-on

    In the settings area the following information is needed to activate and link the Mollie - iDeal account to the form:

    • Enable iDeal-Mollie?: Select "Yes" to enable the Mollie - iDeal addon. This selection will disable automatically the PayPal Standard option.
    • Mollie API Key: The API Username provided by Mollie for your account, it may be the test key or the production key.
    • If payment fails return to this page: If the payment fails the customer is redirected to the page indicated in this field.

    When enabled, the customer will be redirected to the Mollie - iDeal payment form after the submision. The process will be similar to the way PayPal Standard works.

    RedSys (Servired, Sermepa, TPV for most banks in Spain)

    The RedSys / Servired / Sermepa addon provides a secure interface for accepting credit card payments through most banks in Spain (Sabadell, Banco Popular, BBVA, Santander, Bankia, Caixa, Bankinter, etc...). You can read more about RedSys at www.redsys.es.

    RedSys Add-on

    In the settings area the following information is needed to activate and link the PayPal Pro account to the form:

    • Enable TPV: Select "Yes" to enable the RedSys TPV. This selection will disable automatically the PayPal Standard option.
    • CÓDIGO COMERCIO: The API Username provided by RedSys or your bank.
    • CLAVE SECRETA: The API Password provided by RedSys or your bank.
    • Mode: Select "Sandbox" for testing purposes and "Production" for charging real payments.

    When enabled, the customer will be redirected to the RedSys payment form after the submision. The process will be similar to the way PayPal Standard works.

    PayPal Express

    With this addon the plugin supports PayPal Express in addition to the PayPal Standard integration. While it works in a similar way to PayPal Standard from the customer point of view (customer is redirected to a PayPal-hosted payment page without entering the credit card data into the WordPress website) it is technically more advanced, this means: it is more stable, more secure and doesn't relay in the IPN notifications for the post-payment actions.

    PayPal Add-on

    In the settings area the following information is needed to activate and link the PayPal Express integration into the form:

    • Enable PayPal Express Checkout?: Select "Yes" to enable the PalPal Express integration. This selection will disable automatically the PayPal Standard option.
    • PayPal Express mode?: Select production for real payments, sandbox for testing.
    • PayPal Express API Key: The API Key for PayPal Express.
    • PayPal Express API Password: The API Password for PayPal Express.
    • PayPal Express API Signature: The API Signature for PayPal Express.

    To get the API keys into your PayPal account follow these steps:

    1. Log in to your PayPal Business account.
    2. Click the My Account tab.
    3. Click the Profile tab. ...
    4. Click Request API credentials under Account information.
    5. Click Set up PayPal API credentials and permissions under Option 1.
    6. Click Request API Credentials.
    7. Click Request API signature.
    8. Click Agree and Submit.


    Stripe (www.stripe.com) add-on

    Stripe

    The Stripe Payments addon provides a way to accept all major cards from customers around the world on web. This addon requires SSL on your website to be able to carry the transaction in a secure way. Credit card data is entered directly in the website without navigating to an external page.

    Using Stripe you can accept credit card payment and also the following payment methods (can be enabled into the add-on): iDEAL, Bancontact, giropay, Przelewy24 and EPS. Includes SCA compliant (Strong Customer Authentication) integration.

    You can activate the add-on in the add-ons area located below the list of booking forms.

    In the settings area the following information is needed to activate and link the stripe account to the form:
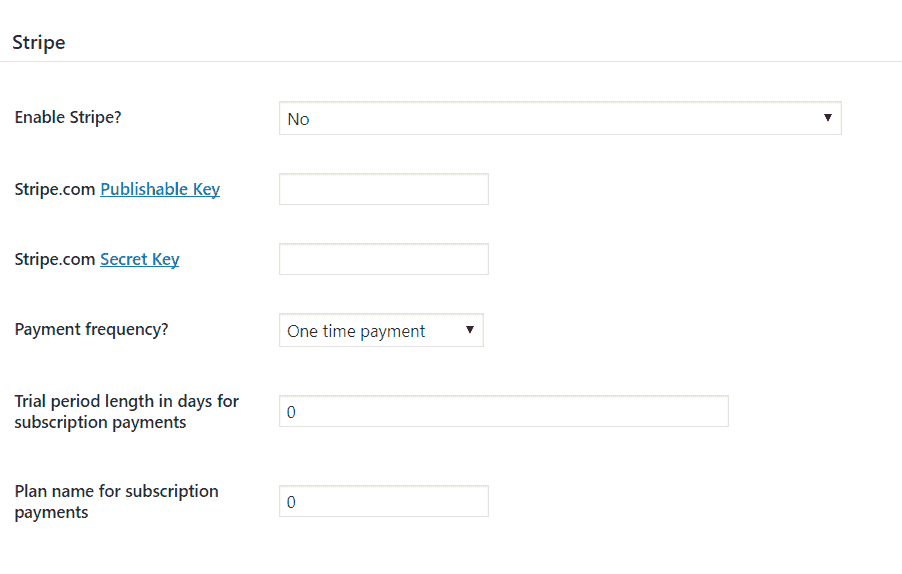
    Stripe settings

    • Enable Stripe?: Select "Yes" to enable the stripe Payments Integration.
    • Stripe.com Publishable Key: Publishable Key you will find into your Stripe account.
    • Stripe.com Secret Key: Secret Key you will find into your Stripe account.
    • Payment frequency? Select "one-time payments" or recurrent (subscription) payments.
    • Trial period length in days for subscription payments: If recurrent payments is selected put here the trial period length in days if any.
    • Plan name for subscription payments: If recurrent payments is selected put here the plan name for subscription payments.

    When enabled, after clicking the Booking Calendar Contact Form submit button, a Stripe floating panel (or a redirection to a Stripe hosted payment page, depending of the integration type selected) will be displayed to ask for the credit card data and process the transaction and after that the form submission will continue as usual.

    iCal Automatic Import add-on

    The iCal Automatic Import addon provides a way to automatically import bookings from external calendars supporting iCal, like for example Google Calendar, Outlook Calendar, iCloud/Apple calendars, etc...

    To activate the add-on, simply visit the plugin page through the menu option: "Settings/Booking Calendar Contact Form", tick the checkbox: "iCal Automatic Import", and press the "Activate/Deactivate addons" button.

    In the settings area the following information is needed to activate and link the iCal calendar:

    Enable iCal import for this calendars?: Select "Yes" to enable the iCal automatic import.

    iCal URL: URL of the remove iCal file to be imported. Unless you know what you are doing it should start with http:// or https://

    The iCal file will be automatically imported every one hour and each time the plugin settings are saved.


    CSV Import add-on

    The CSV Import addon allows to import bookings from a CSV file.

    To activate the add-on, simply visit the plugin page through the menu option: "Settings/Booking Calendar Contact Form", tick the checkbox: "CSV Import", and press the "Activate/Deactivate addons" button.

    The import option will appear after the list of add-ons in the page that contains the list of calendars:

    CSV Import Add-on

    The format of the CSV file must be similar to the format of the CSV files exported form the "Bookings list". This means that the first line of the CSV file must contain the column names with the first column being "Calendar ID" and the next data rows must contain the Calendar ID in the first column.

    To make the CSV file edition easier export first a CSV file from the "Bookings list" and then use that file as sample to create/edit the CSV file you want to import.

    This feature can be used to export/backup the bookings and later re-import them. Note however that all the bookings in the CSV file are imported again, so keep that in mind to avoid duplicates in the database.
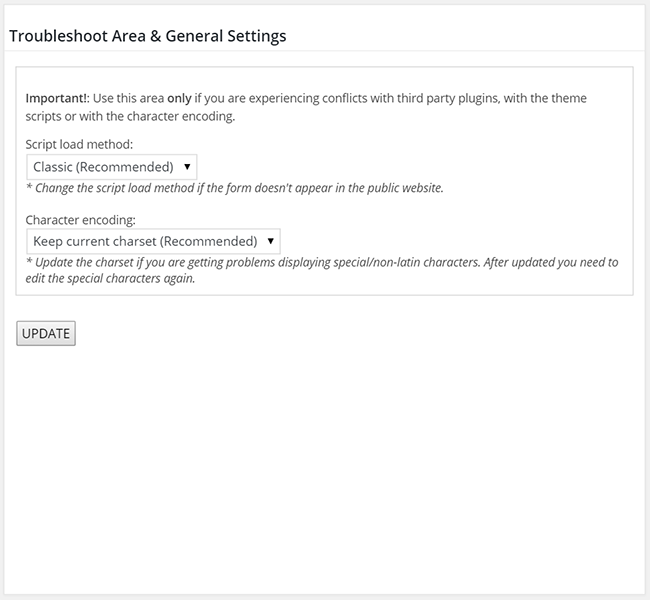
    Troubleshoot Area & General Settings

    Throubleshoot Area

    The "Troubleshoot Area & General Settings" section, allows correct some possible issues, or conflicts with third party plugins, and define the general settings.

    • Script load method: Changes the script load method if the form doesn't appear in the public website.
    • Character encoding: Updates the charset, if you are getting problems displaying special/non-latin characters. After updated you need to edit the special characters again.
    Printing a Form

    For printing only the form, but not the rest of page, please, follows the steps below:

    1. Inserts a "HTML Content" field in the form, and enter as its content the piece of code:
      <SCRIPT>
      function printForm(){
      	var w = window.open(null, 'Print_Page', 'scrollbars=yes');
      	jQuery('#fbuilder input').each(function () {
      		var e = jQuery(this);
      		e.text(e.val()).attr('value', e.val());
      		if (e.hasClass('large'))
      			e.css('width', '100%');
      		if (typeof e.prop('checked') != 'undefined')
      			e.attr('CHECKED', e.prop('checked'));
      	});
      	var html = jQuery('#fbuilder').html();
      	jQuery('#fbuilder TEXTAREA').each(function () {
      		var e = jQuery(this).parent().html();
      		html = html.replace(e, jQuery(this).val());
      	});
      	jQuery('#fbuilder SELECT').each(function () {
      		var e = jQuery(this).parent().html();
      		html = html.replace(e, jQuery(this).find('option:selected')[0].text);
      	});
      	w.document.write(html);
      	w.document.close();
      	w.print();
      }
      </SCRIPT>
      
    2. Inserts a button field in the form and call the function defined previously from its onclick event:
      printForm();